Wednesday, November 29, 2017

Analytics using Power BI & Dynamics 365 - Part-2 The Desktop

This is a part of my multi-series blog about analytics with Power BI and D365. Part-1 of the blog is here. This blog focuses on Power BI Desktop.

In order to gain insights from data it is imperative for users to be able to easily create their own visuals and do as needed analytics. Power BI Desktop allows you to connect, create and publish the analysis, reports and visualizations. 


Below is an example of a custom dashboard I created using Power BI desktop & Dynamics 365 Sales. 


The pie charts on top show the Opportunity and Cases breakdown by Account. This information may not be seen as valuable. Now in the bottom are line and bar charts, where I have combined the data and am able to gain some valuable insights.
  1. There are few accounts which have good opportunity pipeline and also have high # of cases open for them. So I can ask my customer service and sales team to work together to make sure the open cases are resolved on priority. 
  2. There are few high opportunity accounts with no activities, so there is not much communication going on with those accounts. This is a flag and I would ask the Sales associate to focus more on those accounts to successfully close the opportunities.

As you can see, using Power BI desktop you can build custom visualizations of your data and get deeper insights which can help you improve your customer engagement. 

The below are the steps to integrate Power BI desktop and Dynamics 365. Assuming you have already created a Power BI account and have an instance of Dynamics 365 online ready.

  1.        Download and install Power BI desktop from here.
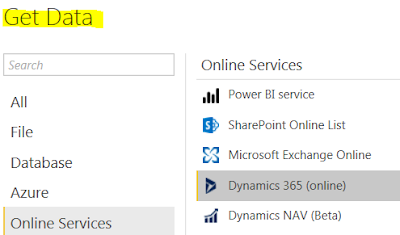
  2.        Open Power BI desktop and select Get Data, click on more and select online services and double click on Dynamics 365 online


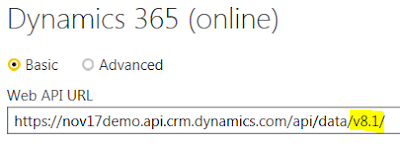
   3.   In the Web API url enter the service root url (you can copy from Dynamics 365 - settings > customization's > developer resources). Remember to change the v9.0 to v8.1 (this may be temporary till Power BI connects with v9.0) 


4.  Use the Organization account to connect to the Dynamics 365 instance.

5.  Once connected, the Navigator window will open and it will load the entities. Select the entity you want to include and click Load.

6.   This brings the entity and its relationship along with the data into the desktop. This may take time if you have large amount of data.

Now you can start creating the visuals and reports. Once done you can save the report and also publish the same to PowerBI.com

Things to note –
  • Recent sources will save the connection info, so you don’t need to do all the steps again
  • Once the report is published to PowerBI.com you can create dashboards and share the same with other users


Hope the above gets you started using Power BI desktop with Dynamics 365. Thanks for reading.

Mihir Shah
365WithoutCode


Tuesday, November 21, 2017

Analytics using Power BI with Dynamics 365

As the usage grows exponentially in Dynamics 365, so does the requirement to analyze the treasure trove of data. Microsoft Power BI is a powerful tool that can be used by business users along with Microsoft Dynamics 365 to get insights on data, visualize trends and take actions.

This blog is part-1 of multi-series blog detailing Power BI analytics with Dynamics 365. This blog focuses on the integration of Power BI with Dynamics 365 online.

Power BI is a set of business analytics tools that enables users to connect, analyze, visualize and get insights from data. Power BI Service is used to connect to and integrate with Dynamics 365 online.

A customer service Power BI dashboard with the Dynamics 365 sample data is shown below – 

Customer Service dashboard - Power BI
     To set-up and integrate Power BI with Dynamics 365 - 
  1.       Pre-requisite -  You will need Dynamics 365 online and Power BI subscription. For this blog I created a demo for Dynamics 365 online and also a trial for Power BI. I assigned the licenses for both the subscriptions to my users. 
Licenses for Power BI / Dynamics 365

Note – The subscriptions for both products are in the same tenant for this blog.

      2.  Set-up Power BI – Login to PowerBI.com and add the content packs. Microsoft has provided few Power BI content packs on Microsoft app source to use with Dynamics 365 – Customer Engagement. For example - 
      •       Sales analytics for Dynamics 365
      •       Customer Service analytics for Dynamics 365
      •       Microsoft Dynamics 365 process analyzer
       3. To get the content pack into Power BI –
        •       In Power BI, click on Get Data
        • ·        Select Microsoft Appsource > Services
        • ·        Search the content packs and click – get it now
        •       Login to the Dynamics 365 online 


Now you should be able to see the content pack in Power BI


       Once the content packs are loaded in Power BI you can see the interactive dashboards                           and visualization of Dynamics 365 data in PowerBI.com.

Now we can connect to Power BI and get the tiles and dashboards to show in Dynamics 365.

       4. In Dynamics 365 Go to System Settings > Reporting Tab and allow Power BI embedding


5.  Now you can create a Personal dashboard, charts and views using Power BI tiles as below. 

Custom dashboard using Power BI tiles

Note - 
1. Power BI tiles cannot be used with System dashboards. You can share the personal dashboard created in Dynamics 365 with other users or teams


Hope the above helps you to get started with analytics with Power BI and Dynamics 365.
      Thanks for reading

     Mihir Shah
     Dynamics365WithoutCode