Wednesday, November 29, 2017

Analytics using Power BI & Dynamics 365 - Part-2 The Desktop

This is a part of my multi-series blog about analytics with Power BI and D365. Part-1 of the blog is here. This blog focuses on Power BI Desktop.

In order to gain insights from data it is imperative for users to be able to easily create their own visuals and do as needed analytics. Power BI Desktop allows you to connect, create and publish the analysis, reports and visualizations. 


Below is an example of a custom dashboard I created using Power BI desktop & Dynamics 365 Sales. 


The pie charts on top show the Opportunity and Cases breakdown by Account. This information may not be seen as valuable. Now in the bottom are line and bar charts, where I have combined the data and am able to gain some valuable insights.
  1. There are few accounts which have good opportunity pipeline and also have high # of cases open for them. So I can ask my customer service and sales team to work together to make sure the open cases are resolved on priority. 
  2. There are few high opportunity accounts with no activities, so there is not much communication going on with those accounts. This is a flag and I would ask the Sales associate to focus more on those accounts to successfully close the opportunities.

As you can see, using Power BI desktop you can build custom visualizations of your data and get deeper insights which can help you improve your customer engagement. 

The below are the steps to integrate Power BI desktop and Dynamics 365. Assuming you have already created a Power BI account and have an instance of Dynamics 365 online ready.

  1.        Download and install Power BI desktop from here.
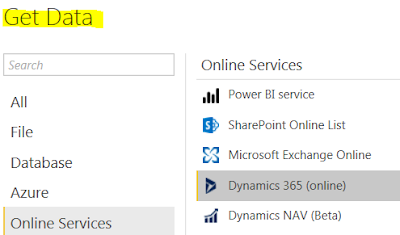
  2.        Open Power BI desktop and select Get Data, click on more and select online services and double click on Dynamics 365 online


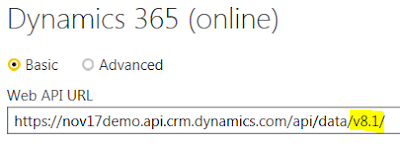
   3.   In the Web API url enter the service root url (you can copy from Dynamics 365 - settings > customization's > developer resources). Remember to change the v9.0 to v8.1 (this may be temporary till Power BI connects with v9.0) 


4.  Use the Organization account to connect to the Dynamics 365 instance.

5.  Once connected, the Navigator window will open and it will load the entities. Select the entity you want to include and click Load.

6.   This brings the entity and its relationship along with the data into the desktop. This may take time if you have large amount of data.

Now you can start creating the visuals and reports. Once done you can save the report and also publish the same to PowerBI.com

Things to note –
  • Recent sources will save the connection info, so you don’t need to do all the steps again
  • Once the report is published to PowerBI.com you can create dashboards and share the same with other users


Hope the above gets you started using Power BI desktop with Dynamics 365. Thanks for reading.

Mihir Shah
365WithoutCode


Tuesday, November 21, 2017

Analytics using Power BI with Dynamics 365

As the usage grows exponentially in Dynamics 365, so does the requirement to analyze the treasure trove of data. Microsoft Power BI is a powerful tool that can be used by business users along with Microsoft Dynamics 365 to get insights on data, visualize trends and take actions.

This blog is part-1 of multi-series blog detailing Power BI analytics with Dynamics 365. This blog focuses on the integration of Power BI with Dynamics 365 online.

Power BI is a set of business analytics tools that enables users to connect, analyze, visualize and get insights from data. Power BI Service is used to connect to and integrate with Dynamics 365 online.

A customer service Power BI dashboard with the Dynamics 365 sample data is shown below – 

Customer Service dashboard - Power BI
     To set-up and integrate Power BI with Dynamics 365 - 
  1.       Pre-requisite -  You will need Dynamics 365 online and Power BI subscription. For this blog I created a demo for Dynamics 365 online and also a trial for Power BI. I assigned the licenses for both the subscriptions to my users. 
Licenses for Power BI / Dynamics 365

Note – The subscriptions for both products are in the same tenant for this blog.

      2.  Set-up Power BI – Login to PowerBI.com and add the content packs. Microsoft has provided few Power BI content packs on Microsoft app source to use with Dynamics 365 – Customer Engagement. For example - 
      •       Sales analytics for Dynamics 365
      •       Customer Service analytics for Dynamics 365
      •       Microsoft Dynamics 365 process analyzer
       3. To get the content pack into Power BI –
        •       In Power BI, click on Get Data
        • ·        Select Microsoft Appsource > Services
        • ·        Search the content packs and click – get it now
        •       Login to the Dynamics 365 online 


Now you should be able to see the content pack in Power BI


       Once the content packs are loaded in Power BI you can see the interactive dashboards                           and visualization of Dynamics 365 data in PowerBI.com.

Now we can connect to Power BI and get the tiles and dashboards to show in Dynamics 365.

       4. In Dynamics 365 Go to System Settings > Reporting Tab and allow Power BI embedding


5.  Now you can create a Personal dashboard, charts and views using Power BI tiles as below. 

Custom dashboard using Power BI tiles

Note - 
1. Power BI tiles cannot be used with System dashboards. You can share the personal dashboard created in Dynamics 365 with other users or teams


Hope the above helps you to get started with analytics with Power BI and Dynamics 365.
      Thanks for reading

     Mihir Shah
     Dynamics365WithoutCode


Tuesday, October 31, 2017

New in Dynamics 365 v9.0 - Multi-select option set, Virtual entities & Flow

This blog is the part of a multi-series blog on the latest updates in Dynamics 365 Customer Engagement v9.0. The Part-1 on User Experience enhancement is here and Part-2 on Apps enhancements is here.
This blog is about the following new features in v9.0 –
1
  •        Multi-select Option sets
  •        Virtual entities 
  •        Microsoft Flow integration


1.      Multi-select Option set – This was one of the most requested and long awaited features which customers asked for in Microsoft Dynamics 365.

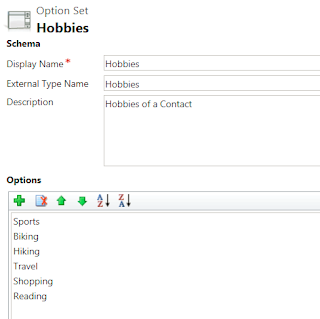
When you are creating a new custom field for an entity. there is a new field type – Multi-select option set.  For example, I am creating a new field for Contact – Hobbies. This is a multi-select option set as each contact can have more than 1 hobby.

Multi-Select Option Set
After creating the new field I can add a list (options) of Hobbies for the Contact.

Hobbies - Multi-select
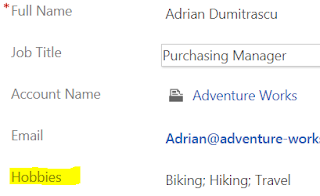
Now add the custom field to the Contact form and you have a multiple choice for Hobbies to select for a contact.

Add multiple Hobbies for a Contact
And once you select all Hobbies for the contact the data looks great. Thank you Microsoft Dynamics 365 product team!!

Nice work!!


Some of the things to know about Multi-select option sets –
  1.         You can enter upto 150 options max in the list
  2.            Multi-select option set can also be a Global Option set (I recommend all Option sets should be  Global Option sets) so it can be used across the board with Multiple entities - For example Hobbies for Leads and Contacts
  3.           You can also add the multi-select option set to a view as shown below
Multiple Hobbies in a Contact View
    
Now it is time to plan for the data transformation - Moving data from custom entities created before multi-select was available, to the new multi-select option set.


2. Virtual Entities –

      Clients have data stored in multiple external systems, applications and databases. It is useful to show the data from external systems in Dynamics 365 and not to import or replicate the data. This is where the new feature of Virtual entities will be beneficial.

      For example Virtual entities provide the ability to connect to an ERP database and show the necessary information for Customer Order status or Account status, payments and receivables information.


Steps to create a Virtual entity –

1. Create a Data Source – Settings > Administration > Virtual Entity Data Sources
2. Enter the necessary information – Note – Currently this support Odata v4.0 only

Data source for Virtual Entity

Once the data source is created you can create the custom Virtual entity and refer the above Data Source.

New Virtual Entity - checkbox
The Virtual entity now can be used in Dynamics 365. Some points to consider about Virtual Entities –
  1. -        Virtual entities are read only
  2. -        Currently it supports OData v4.0 service
  3. -        You cannot trigger workflows or plugins with the data retrieved from Virtual entities, as the data is not stored
  4. -        Only organization owned entities are supported
  5. -        Field level security is not supported with Virtual entities
  6. -        The external data source entities must have a GUID primary key


3.  Microsoft Flow  – A user can now create or edit a flow from within Dynamics.

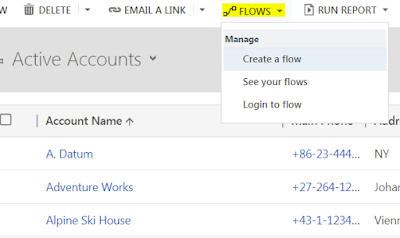
The flow button is available from a list view or record form – For example on the active Account list view the following flow options are available.

Flow in Dynamics 365
It requires the user to have an account and login to Flow. Once logged into Flow, they can create a new flow, manage all the created flows and see the run history of the flows.

I have few concerns with the Flow integration –

1.      Flow is useful for a system admin to create integrations between Dynamics 365 and 1 or more external application. For any internal to Dynamics 365 processes I would prefer to use Workflows or Actions within Dynamics 365

2.      There is no Global setting or configuration in security role within Dynamics 365 to control which user/s can use Flow. I think this is a security flaw and it may require admins to disable the flow button for all users except the few who can and should be allowed to create flow

3.      There is a cost to the Flow runs and it needs to be compared with other options

I hope the above is useful for you and let me know your observations on the above.
Thanks for reading.

Mihir Shah
365WithoutCode

Tuesday, October 17, 2017

New in Dynamics 365 v9.0 - Apps Enhancement

This blog is part-2 of a multi-series blog which focuses on the new enhancements to Dynamics 365 (v9.0) Customer Engagement application. 

The Part-2 of this blog is on Apps enhancements. You can read the Part-1 - enhancements to the User Experience here. With this release Microsoft is moving to an Apps based application development and consumption model and I get the feeling that everything is in Apps and App is everything.
  1. Apps  - Introduced in Dec’2016 update is further enhanced and it is now the default way to create unique user interface and experiences. I had a blog earlier which details how the app is designed and you can read it here.


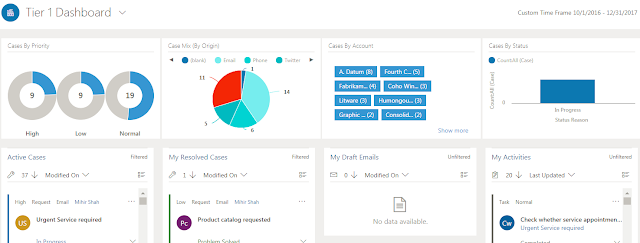
Here is how the new Tier-1 Customer Service dashboard looks like – 

Fig-1: new Tier-1 Dashboard

Below is the app designer. When creating a new App you can copy from an existing app and all the components gets copied over.


Fig-2 – App designer

2.  App Type - Microsoft has 9 OOTB managed apps as listed below. The Apps can be differentiated into 2 types based on the Client type.
Fig-3 – App Client Type
The table below shows all the managed apps with client type. (Note - I am using a trial version for this blog)

Table-1: OOTB managed Apps with Client Type
Note – All the apps above are accessing the same instance (and hence the same data) of Dynamics 365.

Microsoft has provided recommendation for the interface for some of the managed app based on performance results.

Table-2: App recommendation for best performance
 3.       Unified Interface – This is a new design framework applicable to all new Apps. It is created to  provide an “optimal viewing and interaction experience for any screen size, device or orientation”.
The new Sales Hub, Customer Service Hub and new mobile app are based on the Unified Interface. 

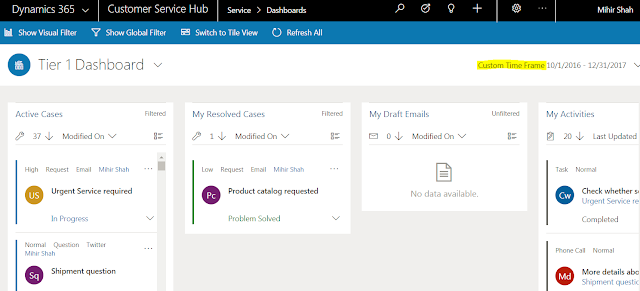
Here is how the new Customer Service Hub app dashboards looks like – (note – I am using the Custom time Frame to change the date range)
Fig-4: Tier-1 dashboard with Visual Filters

Fig-5: Tier – 1 Dashboard


The Case form – The unified interface changes can be better appreciated when we look at the form design changes in the Case form.

·        It has the new Timeline feature.
·        The tabs are now on the top – Summary / Details / ….
·        The time is now shown (16 D) in the business process flow stage
·        When clicking on the stage (example – Identify) it will show you the steps in that stage

Fig-6: The new Case form design

4.         Security – Apps can be secured by limiting the security roles that have access to the apps. 
Go to the Custom App and within the custom app go to Settings > My Apps.
Select the App you want to secure the access to and click on the “…” and select ‘Manage Roles’


In summary, some of the points to consider when designing with Apps.
1
  •       Create a new app from an existing managed app. This will copy all the components within the Managed apps
  •       Secure the access to the app and provide a user friendly url
  •       Follow the recommendation for performance from Microsoft
  •       Some of the new features like timeline view is only available in the unified interface app

Hope the above helps you to jump start using the new Apps within Dynamics 365. Do let me know if there are any new feature which you like or dislike. Thanks for reading.
Mihir Shah
365WithoutCode


Wednesday, October 4, 2017

What’s new in Dynamics 365 v9.0 – Part-1 User Experience enhancements

Microsoft has recently announced the release of Dynamics 365 v9.0. This blog focusses on the new enhancements to Dynamics 365 (D365) Customer Engagement applications including – Sales / Customer Service / Field Service / Project Service Automation.  This is a major release from Microsoft and also it was much awaited. I had the opportunity to be part of the preview program and got to test out some of the new functionalities and enhancements.

The Part-1 of this blog is on enhancements to the User Experience.


New form design for v9.0
       D365 v9 has vastly improved user experience with a new form design, tabs and consistent spacing. One of the pet peeve of many clients was the amount of white space on forms. This version aims to reduce / eliminates the white space as shown above and detailed below.

a.      The forms are now divided into containers for content display. There is a border along each container
b.      The spacing of sections and fields is standardized and the fonts on the form are standardized
c.      There are horizontal tabs and buttons, making it easier for a touch enabled experience
d.      The empty sections have a default message for the user
e.      The colors of the sub-grid can be customized (example - Recent Cases). 

Add color to Sub-grid on a form

f.   There is a new system wide setting for text wrap that Admin can enable or disable.

Text wrapping feature
g.    There are now 3 standard themes to select from – Customization > Themes

New themes
h.      Search – Advanced find now has the “Does not equal” operator. For example - I want to find all contacts which are not in the State of NY.
"Not-In" operator


Let me know your feedback on the new user experience enhancement. In my next part of this blog, I will write about the other enhancements in v9. Thanks for reading.
Mihir Shah


Thursday, August 3, 2017

Dynamics 365 online or on premise ?

        This is an age old question and I thought that cloud had won the battle. But that is not always the case and business are still debating about going online and staying on premise. There is also not one single answer to the question, as each business case is different and needs to be evaluated. Businesses focus on the costs or/and features (capabilities) of going online in the cloud vis a vis staying on premise. 

      There are many other aspects that needs to be considered before deciding on the route of going online or on premise with any business app including Dynamics 365. I think the points below are relevant for all business app cloud decisions and needs to be considered by management. This blog focuses on the aspects and differences in the cloud decision for businesses considering Dynamics 365. 

The major aspects to be considered are –

1.      Strategic
2.      Security
3.      Financial
4.      Dev Ops / Maintenance
5.      Functionality / Features


1.      Strategic – Moving the business applications to cloud is a strategic decision. There are many factors –
a.      Gain competitive advantage - IT and business users can focus more on building and supporting their core business applications and improving operations instead of managing the supporting IT infrastructure needed for on premise apps management.
b.      Go Digital faster – Going digital with business applications enable faster go to market capabilities for business and keeps them ahead of competition. Customers needs and demand change and to respond to the same it becomes imperative to embrace the cloud platform
c.      Cultural change – Once a decision is made to go online it is also important to stay online. This requires a cultural change for both IT and business ops teams. Some of the changes include embracing design thinking and agile development and delivery.
d.      Microsoft cloud – Dynamics 365 alone cannot be the consideration for going online. We also need to include Office 365 and Azure platform in the decision making.  Businesses need to be able to add and manage all 3 Microsoft cloud offerings

2.      Security – Security was a major concern when moving to the Cloud. With Azure active directory integration it enables the D365 online app to be as secure as on premise. In addition Microsoft has built data center for major countries / regions for example data center for Euro. Also data centers are created for Government agencies requiring FedRamp and Hippa supported. This make security a less of a concern than before for major business apps.

3.      Financial – CFO and Controllers make decisions on the financial aspects of going online or on premise with business apps. From a pure licensing cost basis it may look like staying on premise is the way to go. But this is deceiving. As there are other on premise costs which needs to be accounted for like – IT infrastructure support which includes the hardware, server, ongoing maintenance, services, rent…
      At the same time the cost of Cloud needs to be considered with the following - 
      1. App development
      2. IT infrastructure - upgrade / update / IT re-skilling
      3. Data migration & user training
      4. Integration


4.      Dev Ops / Maintenance – IT team have over a period of time built and fine-tuned the development and maintenance for on premise business applications. There can be multiple on premise integrations built that now may need to be moved to the Cloud. In addition there is the concern of being forced to update / upgrade every year with new release of Dynamics 365.

All the above requires a change in how the IT operations are managed. The IT teams have to be trained and re-skilled to learn new technologies like Azure. IT teams have to embrace agile development and delivery and focus on the customer benefits for each deployment (Design thinking). IT teams have to be prepared and ready for the change to be able to move and mange the business applications online.

5.      Feature / Functionality – Microsoft is going with its Cloud first mission and delivering new and advanced functionality in the Cloud. The below lists a set of functionality that is only available for Dynamics 365 online. As new capabilities gets added (especially with Azure and Cortana) and functionalities change the below list may also need to be updated.

#
In Dynamics 365 online only – as of July 2017
1
App designer and Site map designer
2
Connected Field Service (IOT)
3
Data export service
4
Customer Insights
5
Azure Cognitive Services
6
Document suggestions
7
Exchange booking integration
8
Gamification
9
Learning path
10
Mobile – with Relationship insights
-        Intune device management
-        Mobile offline
-        Task based exp.
11
Office 365 Groups
12
Portals – Partner Portal
-        Customer Portal
-        Self-Service Portals
14
Project Service Automation
15
Relationship Insights
16
Relevance Search
17
Resource scheduling optimization
18
Azure Machine Learning
-        Product recommendation
-        Knowledge base suggestion
19
Organization Insights dashboard
20
One note integration
21
3rd party S2S inbound authentication

In preview – Under development
1
Bulk data loader service
2
Cortana Integration for Sales
-        Sales Digest
-        Account overview
-        Deal overview
-        Meeting prep
3
Customer backup and restore – Azure storage
4
Linked In connector for Lead Gen
5
Relationship Analytics


As detailed above there are many factors for choosing between Dynamics 365 online or on premise. Let me know your views and experiences. Thanks for reading.