Power BI has become one of the top data visualization tools. In every project that I have worked on, the default option to visualize, analyze and reporting tool with Microsoft Dynamics 365 is Power BI. It is a natural out of the box fit and Microsoft is doing its best to make the default choice with Dataverse.
I have written earlier about D365 and Power BI but in the journey of evolution, the Power Platform has very much changed and it is time to have a fresh look. In this blog series we will ponder over the ways to -
1. Connect Power BI with Dataverse (D365) - This blog #1
2. Perform D365 data transformations & generate valuable AI insights in Power BI
3. Create and import data visualizations in Power Platform from Power BI
4. Limitations and things to consider (like security) when using Dataverse and Power BI
 |
| PBI dashboard with D365 |
Pre-requisite - In order to get started with Power BI you will need the following -
1. A D365 / Dataverse environment - You can get a trail of Dynamics 365 using trials.dynamics.com
2. Power BI (free or paid) license - PowerBI.com
3. Power BI desktop (download free from PowerBI.com)
Once you have done the above we are ready to play with D365 and Power BI
A - Setup needed - For this blog series we will need the capability of adding Power BI visuals into D365 (dashboards and visuals) as well as enable the TDS (Tabular Data Stream) endpoint. This is done by going to admin.powerplatform.microsoft.com and select your D365 environment (tip - its not the default one). Environment > Settings > Product > Features and enable the 2 highlighted below
B - Connecting Power BI with Dataverse (D365)
1. Once you have the above and downloaded the Power BI desktop latest version (note the version changes ever month) you can click on > Get Data.
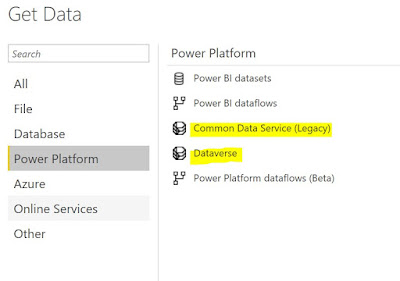
This will open up a myriad of options (enough to baffle you and maybe you feel like in a candy store), but lets focus on the Power Platform for now. Select Power Platform and you have 2 main options (dataflows is not the topic of my current blog, maybe in the future)
 |
| Connect options |
Dataverse connector is the latest one offered (I am going to use it for this blog) The limitation here is that the size of the dataset is limited to 80MB. If your needs are more than 80 MB (which is quite obvious when using large datasets) use the CDS legacy connector. I am hoping that the Dataverse connector allows larger datasets in the near future.
Once you click on connect with Dataverse. it will ask you if you want to import data or do a Direct Query. For this blog I am going to import the data into Power BI. At this time it is important to note that there is an important security difference between importing data into Power BI and using Data query. I will revisit this in my next blog.
 |
| Connectivity mode |
Another thing that you will need to enter is the environment domain. It used to be simply coping your D365 domain url but Microsoft has made it a little complex. Now you are supposed to enter the url without https:// and remove the / in the end (had to do this twice just to get it right) If you don't know what is your environment domain url Go to Make.powerapps.com select your environment (not default) and click on Settings > Session details.
 |
 |
| Instance url |
 |
| Select Table |
Once you select a table make sure to select 'Transform Data' which will open up the Power Query Editor
 |
| Select columns to import |

No comments:
Post a Comment
Please add your comments and feedback. Thanks for reading.