Friday, February 12, 2021

Power BI Template Apps - Power BI with Dataverse (D365) Part-2

 In my earlier blog I had written about connecting with PowerBI and Dataverse (D365) using the CDS or Dataverse connector. You can also use the Power BI template Apps that Microsoft has provided to see your Sales or Service data in PowerBI.com

As always there are pre-requisites for using the Apps. They are - 1. You need to have a Power BI - Pro license for all users who want to consume the app and also 2. Admin access to install the App and connect to D365.

So now that we have the requisite license and access let us install the template app. There are 3 D365 - Power BI template apps. They are shown below with demo data

1. Sales Analytics. https://tinyurl.com/88g43r2m


Sales Analytics Power BI App

2. Process Analytics: https://tinyurl.com/5ybgdqze

Process Analytics App

(I am not a fan of the background bluish color but that can be removed using PBI desktop as I have mentioned below)

3. Customer Service Analytics: https://tinyurl.com/3a2v2pmg

For this demo I was unable to get the demo data loaded in the app or connect the app to D365. This is from the Appstore -

Customer Service Analytics Power BI

I will write about the Sales Analytics App below -

1. Install - Go to https://tinyurl.com/88g43r2m  and click on Get it now (or in PowerBI.com go to Get Data and search for Sales Analytics app)

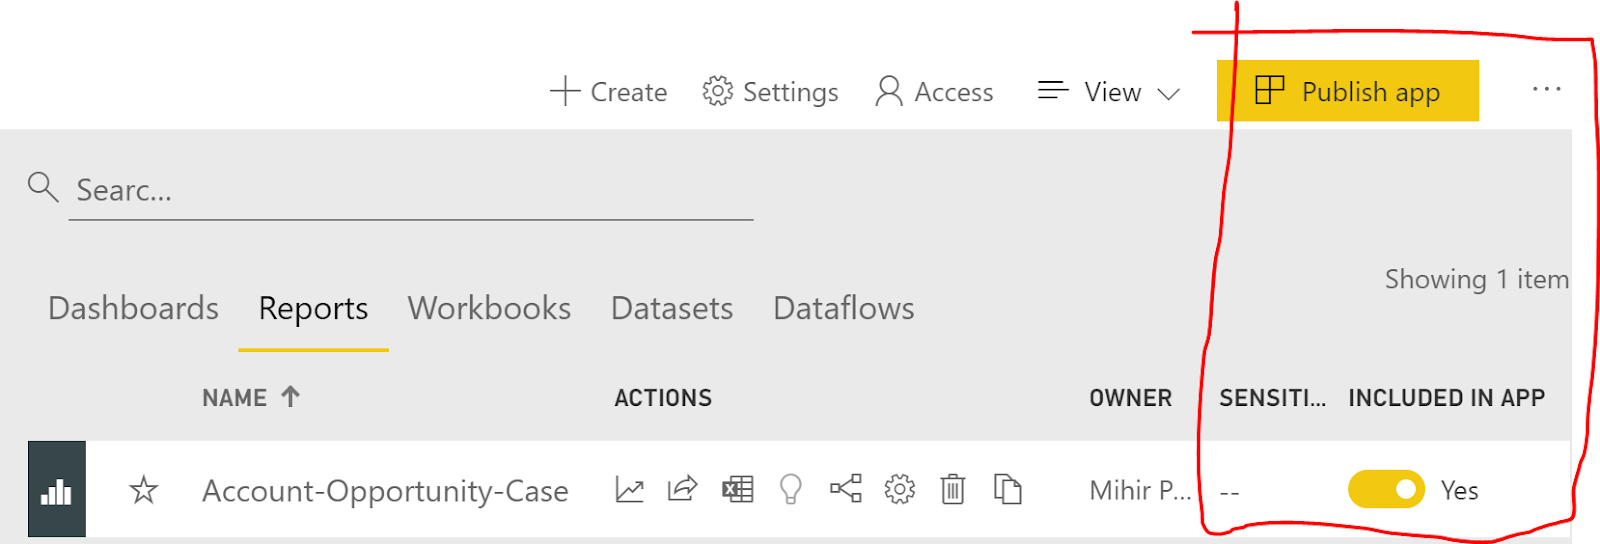
2. Once the app is installed you will see the App in PowerBI.com You will be able to see the App with demo data. You can also connect the App to your specific D365 / Dataverse instance. Once connected the D365 instance data will load into PowerBI.com

You get the below different reports in Sales Analytics App. 


3. You can than analyze the data in PowerBI or you can import the dashboard into D365. (I will write more about this in my later blogs)

4. The OOTB app does not have any custom tables and you will need to customize the App. This is now possible by downloading the Power BI report and importing the PBIX file into Power BI desktop.  Use the link below for downloading the Sales Analytics or Process Analytics Power BI report PBIX file.     

        https://tinyurl.com/1royw6my

5. Now you can add the custom tables and columns to the Power BI reports and create your own App.

I believe that the template apps are a very good starting point to use Power BI with Dataverse. Let me know if you have any questions or any other ideas of using Power BI with Dataverse / D365. 

Thanks for reading

@mihircrm / 365withoutcode

Sunday, January 31, 2021

Getting started using Power BI with Dataverse (D365) - Part-1

Power BI has become one of the top data visualization tools. In every project that I have worked on, the default option to visualize, analyze and reporting tool with Microsoft Dynamics 365 is Power BI. It is a natural out of the box fit and Microsoft is doing its best to make the default choice with Dataverse. 

I have written earlier about D365 and Power BI but in the journey of evolution,  the Power Platform has very much changed and it is time to have a fresh look.  In this blog series we will ponder over the ways to -

1. Connect Power BI with Dataverse (D365) - This blog #1

2. Perform D365 data transformations & generate valuable AI insights in Power BI

3. Create and import data visualizations in Power Platform from Power BI

4. Limitations and things to consider (like security) when using Dataverse and Power BI

PBI dashboard with D365

Pre-requisite - In order to get started with Power BI you will need the following -

1. A D365 / Dataverse environment - You can get a trail of Dynamics 365 using trials.dynamics.com

2. Power BI (free or paid) license - PowerBI.com

3. Power BI desktop (download free from PowerBI.com)

Once you have done the above we are ready to play with D365 and Power BI

A - Setup needed - For this blog series we will need the capability of adding Power BI visuals into D365 (dashboards and visuals) as well as enable the TDS (Tabular Data Stream) endpoint. This is done by going to admin.powerplatform.microsoft.com and select your D365 environment (tip - its not the default one). Environment > Settings > Product > Features and enable the 2 highlighted below


B - Connecting Power BI with Dataverse (D365)

1. Once you have the above and downloaded the Power BI desktop latest version (note the version changes ever month) you can click on > Get Data. 

This will open up a myriad of options (enough to baffle you and maybe you feel like in a candy store), but lets focus on the Power Platform for now. Select Power Platform and you have 2 main options (dataflows is not the topic of my current blog, maybe in the future) 

Connect options

Dataverse connector is the latest one offered (I am going to use it for this blog) The limitation here is that the size of the dataset is limited to 80MB. If your needs are more than 80 MB (which is quite obvious when using large datasets) use the CDS legacy connector. I am hoping that the Dataverse connector allows larger datasets in the near future. 

Once you click on connect with Dataverse. it will ask you if you want to import data or do a Direct Query. For this blog I am going to import the data into Power BI. At this time it is important to note that there is an important security difference between importing data into Power BI and using Data query. I will revisit this in my next blog.

Connectivity mode


Another thing that you will need to enter is the environment domain. It used to be simply coping your D365 domain url but Microsoft has made it a little complex. Now you are supposed to enter the url without https:// and remove the / in the end (had to do this twice just to get it right) If you don't know what is your environment domain url Go to Make.powerapps.com select your environment (not default) and click on Settings > Session details. 


Instance url

Once you have the details and click 'ok' you may be prompted to sign in (if you are not already signed in) and then shown the Navigator window to chose from the tables to import into Power BI. 
Select Table

Once you select a table make sure to select 'Transform Data' which will open up the Power Query Editor 
Select columns to import
Here click on Manage Columns and you will be able to select which columns you want to import. It is important to know the Dataverse data model to be able to understand what columns you will need to create your visualizations.

Once you have selected the columns click on Apply and this will start the import process. In my next blog we will look at the options for working with D365 data in Power BI. 

Hope this helps you to get started with using Power BI with Dataverse (D365). Thanks for reading.

@mihircrm
365WithoutCode


Monday, December 7, 2020

Microsoft Dynamics 365 - Customer Voice - An Overview - Part-1

 Microsoft has created Dynamics 365 - Customer Voice and this blog is to provide an overview of the features.

Customer Voice is an Enterprise Customer feedback design, collection and management app. It allows you to design / send surveys and collect / analyze feedback from the surveys sent. Customer Voice is an enhancement to and re-branding of Microsoft Forms Pro. The data is stored in Dataverse (another rebranding - previously CDS) and it can be connected to a Dynamics 365 environment. 

1. Demo - To setup a demo of Customer Voice - go to this link. https://dynamics.microsoft.com/en-us/customer-voice/overview/ and sign up for a 30 day demo. 

2. Project - Once the demo environment is up you will be creating a Project. The project is a repository for all your Survey related data (Surveys, Satisfaction metrics, Email templates, Power Automate flows and Reports). Project is linked to a specific Dynamics 365 / Power Platform Dataverse environment. So if you have Dev / QA / Prod environments you can create and link a project for each specific environment. 

Microsoft provides easy to deploy Project templates or you can select a Blank template. 

You can also share a Project with other users so that other users can design and send their own Surveys. 

3. Design Surveys - Once you have created the Project, now you are ready to design your own Surveys. If you selected a Project template the first survey is already created for you to customize and built upon. You can modify / add questions to the survey.

Design Survey
You can customize your survey to include -

  1. Personalization - Adding upto 15 variables in your survey (First Name, Last Name, ...)
  2. Branding - Changing theme, font and background 
  3. Metrics / KPI - Adding upto 10 customer satisfaction metrics per Project
  4. Add Survey Language - You can add upto 23 languages and the Survey question translation
  5. Add Branching - using Power Automate flows
  6. Formatting - Add Progress bar, question #'s and shuffle questions
You can also preview and test the Survey to make sure it works as designed.

4. Send Survey - Once the design is done you can send the Survey using multiple options
  1. Email - Send the survey using email.
  2. Power Automate - Trigger a survey email using Power Automate
  3. Embed - the survey in a web page
  4. Send a link to the Survey in an email or add to web page 
  5. Send a QR code of the survey by email or add to web page
    The Distribution settings allow you to customize the survey send settings.

Send Survey
A survey invitation record is created for every survey sent by email or using Power Automate to trigger an email. Statistics is collected on the survey invitation and analyzed.

5. Analyze responses - 

The response received are analyzed and reports generated. There are 2 types of reports.

1. Satisfaction metrics (Customer KPI reports) - They are based on the answer to the questions linked to metrics. The satisfaction metrics can be - CSAT / NPS / Sentiment

2. Survey response - A report is generated for every survey sent and response received.

Metrics report

Survey report

Hope this blog helps you getting started on the Customer Voice and let me know about your specific questions / experience using it. In my next blog I will write about some important considerations for using Customer Voice. Thanks for reading. 

@MihirCRM

365WithoutCode

Thursday, October 1, 2020

Industry accelerators - Dynamics 365 - Introduction - 1

   Microsoft has introduced Industry accelerators which provide specific industry vertical solutions. This blog series is to discuss and learn about the latest in the Industry accelerator updates including the Oct. Wave-2 release.

What are Industry Accelerators ? - 

  • They are Industry specific vertical solutions as envisioned by Microsoft. 
  • They are built upon the foundational components within Microsoft Power Platform and Dynamics 365
  • Microsoft has made them freely available on the AppSource an Github. 


There are currently 7 Industry Accelerators - 
  1. Automotive
  2. Education
  3. Financial Services
  4. HealthCare
  5. Manufacturing
  6. Media and Communications
  7. Non Profit
The above accelerators is also an opportunity for ISVs and developers who can build upon and extend them to create their own industry specific vertical solutions 


As a Dynamics 365 - solution architect / business consultant, this helps to understand specific industry business scenario. It also can help to guide you on how best to design a solution for the industry specific requirements. 
In my future blogs I will write more about each of the industry accelerators, the latest updates and I hope it helps to provide more insights in the specific industry verticals.

Thanks for reading. 

Mihir 
365WithoutCode


Friday, June 12, 2020

Collaborating with Power BI

Power BI helps you to enhance the value of your data. This value is multiplied when you are able to collaborate with others - by publishing, sharing and embedding or integrating your reports on website, portals and in mobile apps. Here are some of the ways to collaborate with Power BI.

Before we discuss collaboration I want to get the licensing clear. In most cases you will need a Power BI pro or premium license to share with others and for others to view your shared report. (There really is no free lunch with Microsoft). The only time you can get users to see the Power BI report without requiring a license is by publishing your report to a public website

1. Embedding of Power BI report - You can embed in the following applications and collaborating with other users -

a. Embed in SharePoint online
b. Embed in Microsoft teams
c. Embed in Portals
d. Embed in a website
e. Embed in Power App

Embed in Power BI


2. Sharing in PowerBI service - You can share your reports and dashboards in Power BI in a workspace or by creating an App. Workspace is preferred for a small group of team members with whom you want to interact to build the report / dashboard. Once you are ready you can create and publish an App to share with the larger audience or for the whole organization. The users can than interact with the report and dashboard.
You can also share the data set with other users who you trust and they can build copies of the report based on the data. 

Publish app from a workspace


3. Publish to a website - You can use the Publish to a (public) website option to share your report with anyone on the internet. Anyone who get to the public website can interact with the PowerBI report and be able to view / share it on social media etc without needing a license. The data refresh can happen approx every 2 hours or more.  Obviously if your data is sensitive you may not want to share on the public web.


4. Integration - You can also integrate Power BI with Power Automate so you can trigger a flow based on the data triggered in Power BI. Isn't that amazing.

Limitations of the above -
I think it is important to know the limitations of embedding Power BI specifically in Website / Portal and I am mentioning some here.

1. Azure B2B is not supported - So if you have external guest users who login to the Portal / Website they may not see the Power BI report.
2. Users will need Power BI license or you will need a Power BI premium license (mentioned earlier)
3. Power BI supports the following browsers and performance may vary
4. Users may have to login to access Power BI report


I will write more about the Power BI and Power Apps integration. Let me know your thoughts on above and if you are using any of the above features in your apps.
Thanks for reading.

@MihirCRM
365WithoutCode

Friday, March 27, 2020

Covid19 - Corona Virus Info Bot - Power Virtual Agent

The Covid19 / Corona Virus pandemic has created major concerns for people all over the world. I hope everyone is safe and taking precaution by staying at home. This blog is to about how to create a Covid19 Safety Info Bot using Microsoft Power Virtual Agent.

The problem - Currently governments at National / State / County / City / Town and Health Care organizations are all trying to provide the information to their citizens. There is a ton of critical information that needs to be provided. People are given a phone # to call which is managed by Call Centers. The Call Centers personnel are having a crisis where the staff have to take risks, travel and be in the call center offices to respond to the callers. Also the volume of call is causing delays and chaos to the people.

Solution -
There are many ways to provide the information to the people. One powerful and simple solution option is to create a Power Virtual Agent Bot and add the same to the Government or Commercial organization Website portal.

The link for the sample bot I have created is here - https://tinyurl.com/rld8gsd (available upto April 19th, 2020)

Corona Virus Info Bot - Sample


Solution details - Here are the steps I took to create the Power Virtual Agent Sample Corona Virus Bot -

1. Create a Power Apps environment - You will need an environment in Power Apps. You may already have a Power Apps account or need to create a new account. You can also create a trial for Power apps at https://powerapps.microsoft.com/en-us/# or trials.dynamics.com

New Power Apps environment 

Once the environment is created with a database you are ready to go with Power Virtual Agents.

2. Set-up a Power Virtual Agent bot - Go to https://powerva.microsoft.com/ You can log in with the same above Power Apps account. Create a new Bot and attach the Bot to the Power Apps environment.

3. Once the Bot is created you need to create the Topics. Adding Topics allows you Bot to answer specific questions based on trigger phrases and provide correct messages.

Topics 

Refer the below topic details and trigger phrases to protect from Corona Virus
Protect from Corona Virus - Topic and Trigger phrases

You can also see the Topic and message on the authoring canvas

Authoring Canvas

4. You can also customize your greeting - the info that the Bot will provide to the customer
Customized Greeting
5. Once you have the Bot configured you can test the Corona Virus Bot and than publish it.

Test and Publish Bot

You can embed the Bot in your website or portal. Here is the sample website for the above Covid19 - Corona Virus Bot which will be available online upto April 19th 2020 for testing.

https://tinyurl.com/rld8gsd

Hope this info helps you to create your own Bot and add it to the organization website. Please let me know if you need any help in creating and configuring the Bot. Thanks for reading. Stay at home and be safe for now.

@mihircrm
365withoutcode


Wednesday, February 5, 2020

Managing Non Conformance with Microsoft Dynamics 365 Supply Chain Management

“Each manufacturer is required to establish and maintain procedures to control product that does not confirm to specific requirements” (21 CFR 820.90). Nonconforming can be a Product or a Process that does not meets its specifications. A nonconforming process can lead to a nonconforming product. This blog discusses how Microsoft Dynamics 365 Supply Chain Management can help manufacturers in managing Non conformance.


Non Conformance business process
Why manage Non Conformance – In addition to the regulatory requirements there are many benefits -
  1. Improved safety of manufactured products
  2. Manage product recalls
  3. Better process equals more effective products
  4. Gain consumer confidence with product reliability
AI and data analytics can also be used on the data collected for predicting and preventing future errors. The business process in Microsoft Dynamics 365 SCM is shown above and discussed step by step here -

1. Product fails quality – This could be during the incoming product inspection or during the manufacturing production process that a product can fail quality testing. It can also be a return of a product from Customer due to product failure.
2. The QA tester will than create the Non Conformance for the Quality Order. The benefit of creating from a Quality Order is that it has all the necessary details (like Vendor, Purchase Order and Batch #). 

Create Non conformance

3. Approve and print Non Conformance Tag – The Tester can than approve and print the Tag and attach to the product. This becomes a visual indicator on the product itself. Tester will move the product/s to a caged or locked area along with other non conforming products.
Tag
1.     4. Review & identify corrections – The product engineer will review the non conformance and identify corrections. Also assign the correction to the worker. Power automate can be used to notify the worker of the task.
Corrections
The assigned worker completes the corrections. The product engineer can than write the justification for the disposition of the items (using Notes) and closes the Non conformance.

5.      Reporting and analytics – This can be used to for management review of non conformance. Some of the reports that can benefit are - 
  • Vendors with recurring # of non conforming products – to improve vendor performance
  • Products with highest # of non conformance – to improve process results
  • Corrections most applied – to re-design the production process
I hope the above helps you to understand and manage the non conformance process using Microsoft Dynamics 365 Supply Chain Management. Let me know how you are managing your current product or process Non Conformance.

Mihir Shah
@mihircrm 
(originally published by Mihir Shah as a linked in article on 11-23-2019)